昨天鄰居想嘗試使用 Linux,大致上都沒什麼問題,但卡到二個點:
- 輸入法:沒有順手的輸入法 (倉頡)
- Office 文件工具組:LibreOffice 的操作實在很不直覺,從 M$ 跳到 LibreOffice 目前還沒聽過有人說好用的。
今天還是幫他改回 Windows 系統,實在可惜。
昨天鄰居想嘗試使用 Linux,大致上都沒什麼問題,但卡到二個點:
這幾天被 Raspbian 安裝搞得七葷八素,所以乾脆把幾個常用設定改好,直接打包給大家用。
我用的是 Raspbian Buster Lite:
我調整過的設定 (目標是接上電源線即可遠端操作):
載點:https://mega.nz/#F!dR5EVABL!Nkynwg5ivQuRyRqpGz1Q4A

SHA1: 71664d5651d660077621f91b29edeecf4810a486
SHA256: 981a8ded523c30f06ec09292445255c55a862e5d756b4e0fff5f8d069ef35afa最後更新時間:2019/05/31
文章開頭先謝謝 ellery 大大,沒有你提醒,我大概會繼續通靈 debug 幾個禮拜 XD
先說明 CodeDeploy 大概的運作機制:
TL;DR
接下來這邊會用較為簡單的方法 (但較不安全 XD) 的說明,來建立支援 CodeDeploy 的 EC2 instance,並做一次 deployment。操作、設定會幾乎按照 AWS 的 document 上的進行,但會調整一些順序讓操作比較順暢。
該做的還是要做,逃也逃不掉。要先幫 EC2 建立一個支援 CodeDeploy 的 Role,EC2 需要從 S3 上面拉檔案,所以除了 CodeDeploy 的權限以外,也要開 S3 的權限。
這邊用最寬鬆的權限來做 demo,若需要更安全、仔細的設定說明,請參考 AWS docs。


接下來,CodeDeploy 的 deploy-er 也需要權限,所以要建立一個 Role 給 Deploy-er 使用。這個就比較簡單,直接使用 CodeDeploy 的 policy 即可。


前文有提到,會把要 deploy 的檔案先放在 S3 上,所以需要開一個 bucket 供 CodeDeploy 存放檔案用。
按照一般步驟建立一個 s3 bucket,除了 bucket name 不要 conflict 以外,其他選項都用預設值即可。我這邊用的名稱是「deploy-for-qwe」:

EC2 其實沒有太複雜的設定,主要就是需要安裝 CodeDeploy agent 而已。
在開機器時,要留意幾個地方,第一個是 instance 的 IAM role 必須是上一步驟建立給 EC2 可以 deploy 的 role:


再來要幫 EC2 instance 安裝 CodeDeploy agent,這邊可以直接參考 AWS install the CodeDeploy agent 的文件說明。
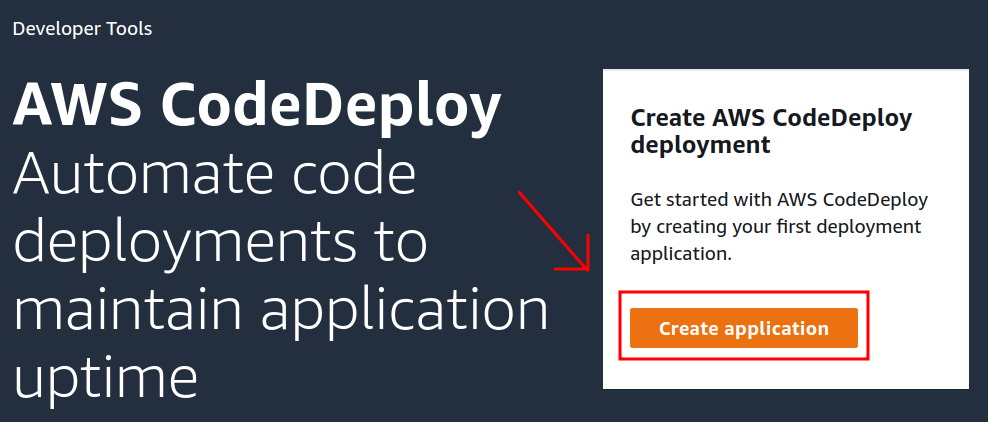
切換到 CodeDeploy 的 console,直接按下「Create application」就對了:

接著建立 deployment group,這邊要選擇前面建立的 CodeDeployRole:

最後選擇預計要被 deployed 的 instance,這個時候建立 EC2 設定的 tag 就很有用了,可以一次選擇多個 instance 或是不同的群組:

這個檔案主要用來記錄、控制佈署時要做的動作,包括停止服務、刪除 cache、把新的程式移動到指定的位置、initialize …. 等等。
appspec.yml 檔案必須放在專案的根目錄,appspec.yml 的撰寫方法可以參考 AWS – AppSpec File Example。
這邊不自己寫 appspec.yml,直接從 AWS 提供的 example 來測試即可。開啟 download resource kit file 頁面,為意選擇一個 example 下載並解壓縮,目錄看起來會像下面這個樣子:
$ tree
.
├── appspec.yml
├── index.html
├── LICENSE.txt
└── scripts
    ├── install_dependencies
    ├── start_server
    └── stop_server
appspec.yml 的檔案內容如下:
version: 0.0
os: linux
files:
  - source: /index.html
    destination: /var/www/html/
hooks:
  BeforeInstall:
    - location: scripts/install_dependencies
      timeout: 300
      runas: root
    - location: scripts/start_server
      timeout: 300
      runas: root
  ApplicationStop:
    - location: scripts/stop_server
      timeout: 300
      runas: root
「version」這個 key 是必要的,其他的 key 看不同的部屬環境而有不同。
這邊要 deploy 到 EC2 instance 上,所以改寫 appspec.yml 到最簡單的寫法:
version: 0.0
os: linux

files:
    - source: index.html
      destination: /var/www/html/
接著,透過 aws-cli 下指令將 source code 打包上傳到 s3 的 bucket 上:
aws deploy push
  --application-name hello-world
  --s3-location s3://deploy-for-qwe/hello.zip
  --source .
藍色標記是需要依照前文自行設定的資料自行修改的文字。
指令成功執行以後,應會看到以下的 response:
aws deploy create-deployment –application-name hello-world –s3-location bucket=deploy-for-qwe,key=hello.zip,bundleType=zip,eTag=0bd6b5414d8315a960ab1256d33b4e9b –deployment-group-name <deployment-group-name> –deployment-config-name <deployment-config-name> –description <description>
既然 AWS 都要你照做了,就不用多想跟著下指令:
aws deploy create-deployment
--application-name hello-world
--s3-location bucket=deploy-for-qwe,key=hello.zip,bundleType=zip,eTag=0bd6b5414d8315a960ab1256d33b4e9b
--deployment-group-name tmp-group

# 後半段非必要參數,所以我刪掉了
指令成功,會回傳 JSON data:
{
    "deploymentId": "d-SDXUUDKFZ"
}
這個時候打開 CodeDeploy 的 Deployments,就會看到有 deploy 正在進行:

執行完成,連到 EC2 instance 上,就可以看到 /var/www/html/ 目錄下多了一個 index.html 的檔案了,deploy 成功!
回到 local 端,對 index.html 的內容做個調整,再做一次 aws deploy push,這次回傳結果也差不多,不過注意紅色標記的部份:
aws deploy create-deployment –application-name hello-world –s3-location bucket=deploy-for-qwe,key=hello.zip,bundleType=zip,eTag=085f6c6ca293276a3072be2e8a5a7870 –deployment-group-name <deployment-group-name> –deployment-config-name <deployment-config-name> –description <description>
「eTag」的 hash 值已經和前一次不同了!
CodeDeploy 上,eTag 的值相當於 product version,不同的值代表不同的版本,所以有必要時可以快速透過 eTag 在個版本之間做切換:

希望這篇說明,可以幫你快速了解 AWS CodeDeploy 的功能以及設定、操作方式。
開機後突然沒有辦法使用快速鍵「Ctrl + Alt + L」來鎖定畫面,覺得很不對對勁。
網路上看了幾篇文章以後,發現螢幕鎖定和 gnome 的 screen saver 都有關係,由於 UbuntuMate 的預設不是使用 gnome,所以找到的是 mate-screensaver-command:
$ mate-screensaver-command -h
Usage:
mate-screensaver-command [OPTION…]
Help Options:
-h, --help Show help options
Application Options:
--exit Causes the screensaver to exit gracefully
-q, --query Query the state of the screensaver
-t, --time Query the length of time the screensaver has been active
-l, --lock Tells the running screensaver process to lock the screen immediately
-c, --cycle If the screensaver is active then switch to another graphics demo
-a, --activate Turn the screensaver on (blank the screen)
-d, --deactivate If the screensaver is active then deactivate it (un-blank the screen)
-p, --poke Poke the running screensaver to simulate user activity
-i, --inhibit Inhibit the screensaver from activating. Command blocks while inhibit is active.
-n, --application-name The calling application that is inhibiting the screensaver
-r, --reason The reason for inhibiting the screensaver
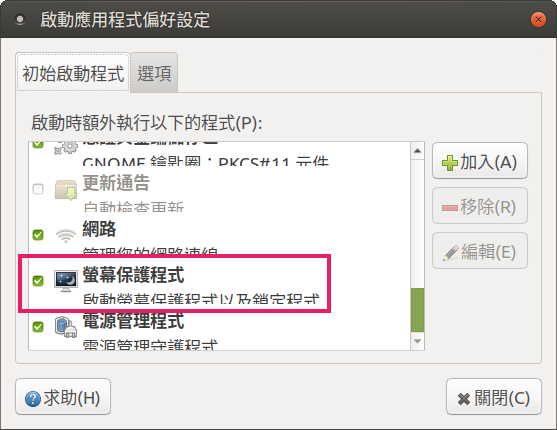
-V, --version Version of this application由於之前腦包把 background daemon 關掉,所以螢幕保護服務沒有啟動,不管怎麼下指令都不會有反應。記得「啟動應用程式」中,把「螢幕保護程式」開啟,以免部份功能失效:
昨天寫了類似以下這樣一段 script:
#!/usr/bin/env bash

set -e

R=`ls /dev/ | grep sd`

echo "Results found:"
echo $R
照理來說,不管 grep 是有有撈到資料,至少會印出「Results found」字樣,但實際執行時卻什麼資料都沒有輸出。
後來使用「bash -xv」來執行,監視值流程,才發現 script 執行到一半就中斷了:
$ bash -xv qwe.sh
#!/usr/bin/env bash

set -e
+ set -e

R=`ls /dev/ | grep sd`
++ ls /dev/
++ grep sd
+ R=
追蹤後發現二個結果交互影響導致 script 中斷:
在 bash 中「set -e」代表遇到錯誤立即中斷執行;而 grep 的 exit code 比較令人意外,當 grep 有找到資料時,則 exit code 為 0 (正常結束),若 grep 都沒有找到指定的字串,則會回傳 1 (錯誤)。這二件事情同時發生,所以就導致了上面的 script 在 grep 執行後就中斷執行。
// ——
shell script 好像沒什麼 debug 的工具,不過在執行時可以透過 bash 的參數,來提供執行時的一些狀態,例如: -xv。